


I am writing today to express my complete sadness, not over the loss of a person, but over the loss of a truly great magazine. When I heard the news that Gourmet had shut their doors, it seemed the only person I could truly relate with was my mom. We have such a connection when it comes to food and Gourmet was one of those connections. The two magazines my mom read when I was young was Gourmet and Sunset. Gourmet was no ordinary magazine, this was "THE" food magazine that carried us along through good times and bad. This was the epitome of real cooking and not just the recipes, the fabulous writing, articles, travel... This is an era that I will never forget and I will hang onto every Gourmet magazine that I own. It will become a reference guide, a treasure, a great resource and an old friend.
We will miss Ruth Reichl, and everyone who contributed to make this magazine
such a success over the years!
Thank you Gourmet for a lifetime of amazing recipes and stories!
Tuesday, October 6, 2009
Thursday, August 13, 2009
Cobblers, Crisps, Brown Betty, Slumps, Crumbles.....
It's funny when you think about it, all the different types of toppings there are for fruit desserts. I mean where did Brown Betty come from and who is Betty anyway?
Here are some of the answers... Oh and I like all the below with a big scoop of vanilla bean ice cream when the dessert is still warm.
Crisps, Crumbles & Buckles- These are great with Blackberries, Marionberries or I like a combo with fresh peaches. Usually made with flour, oats, sugar, softened butter, salt and spices (optional). All three have a streusal type topping which gives it a buckled or crumpled appearance. Easy and delicious.
Cobblers- My husbands favorite which is more of a biscuit-like topping. In my recipe I add 1/4 cup cornmeal to 1 1/2 cups flour, whipping cream, baking soda, baking powder,1/2 cup sugar ( I like the evaporated. organic cane sugar in the topping). Add 1/4- 1/2 cup regular sugar to berries, depending on sweetness, allspice, cinnamon, nutmeg and 2 Tablespoons flour. YUM!
Brown Betty- Anyone with the name Betty can take credit for this recipe! This one dates back to Colonial times and has two different methods:
One of the oldest recipes found is basically like a bread pudding with apples. The other recipe for Brown Betty is when the apples are sprinkled with brown sugar (hence the name), cinnamon, dash of salt and bread crumbs sprinkled over the top and baked. I'd drizzle a little butter over the bread crumbs or toss the bread crumbs with melted butter, then sprinkle over apple mixture. Top with Vanilla ice cream. With the bread pudding version I would add caramel sauce and ice cream.
Slumps and Grunts-"Early attempts to adapt the English steamed pudding to the primitive cooking equipment available to the Colonists in New England resulted in the grunt and the slump, a simple dumpling-like pudding, (basically like a cobbler). Usually covered and cooked on top of the stove. In Massachusettes, they were known as a grunt (referring to the sound that the berries made while cooking). Phew! Always wondered about that one! In Vermont, Maine, and Rhode Island, the dessert was referred to as a slump.
Pandowdy-This dough is rolled out, like a pie crust but but ends up being flaky and delicious.
Clafouti- A custard-like French dessert. Reminds me of a thicker version of a Dutch Baby (flour, eggs, milk & butter) Fruit is placed in a buttered baking dish, custard
is made, then poured on top and baked.
Hope you enjoy making the different variations while berries are at their prime right now!
Julie
Thursday, August 6, 2009
Julie & Julia
My mom and I went to see the sneak preview of Julie & Julia and it was fantastic! Meryl Streep plays a perfect Julia. Her mannerisms, voice and sense of humor was just as I remembered! It is everything I expected and more. It made me laugh, cry and want to eat and cook! My mom who had the great honor of knowing Julia Child and Simone Beck (Simca) said the actresses portrayed them well. You see the personal side of Julia and the sweet relationship she had with her husband, Paul. I'll never forget when I was at a special event for Julia and I went up to her and said "hello", I had met her years before but as soon as I said I was Sharon Kramis' daughter she instantly responded and said "say hello to your mother she's a great cook". I thought wow! My mom has been my mentor all these years and to hear Julia Child speak so highly of her was wonderful.
When my mom was in Provence taking cooking classes from Simone Beck, Julia and Paul lived on the same estate and after one of the classes Julia invited my parents over for hor d'oeuvres and wine. She served parsley ham, olives, thickly sliced french bread, toasted (butter served alongside). Paul served wonderful French wines. When I was a teenager my mom had Simone Beck over for dinner. It was a time I will never forget. It was great to see a movie not just about Julia but also Simca, who was also amazing and changed the way we cook today. We may not live in France but we can sure cook and eat like we do. Julie Powell what a cool woman to take on such an amazing goal and follow through to the end. You are truly inspirational as well and I think Julia would be proud.
Julie
Tuesday, June 9, 2009
The Incredible, Edible Egg
Do you ever have questions when you are cooking such as:
When I am hard boiling an egg, do I add the egg to cold water or
boiling water? Why do I sometimes get a blue ring around the egg yolk?
When you are hard-boiling an egg there are different schools of thought on the best way to hard-boil an egg.
I like to remove my eggs from the refrigerator to take off the chill, about 15 mnutes. Add eggs to cold water. Bring to a boil and turn down heat to med.-low or a smiling boil. Cook for 12 minutes. Remove from heat
and place in a bowl of ice water. Crack under cold water, removing shell. When you decrease the temperature while cooking , this also shrinks the egg inside the shell making it easier to peel.
My other favorite way to have eggs is a 4 minute egg cooked the same way but just briefly run under cold water.
I like to use an egg topper or cutter to remove the top of the egg. A favorite is the Clack precision cutter www.eurocosm.com which cracks the egg using pressure and forming a perfect circle. I love eating right out of the egg
with a medium soft yolk which is great with buttered toast. Eggs are amazing the way they
make a souffle or a Dutch baby puff up, it's like magic. Eggs are the used in everything from baking to zabaglione to fritatta's. It is the single most important and widely used ingredient.
I don't know what came first, the chicken or the egg but I am glad there are eggs.
I am currently on Vashon Island where they have great farms. I love to get fresh eggs, when the yolks are bright orange in color. I am on my way to check out some new cheese and dairy farms. Speaking of Vashon Island and eggs, if you haven't ever read the book "The Egg & I" by Betty MacDonald, you have to check it out. She lived on Vashon Island and it is a classic. Good read for a teenager too! Gotta run but I'll let you know what I find out.
Best,
Julie
Wednesday, May 20, 2009
Here is a great recipe that my mother taught me how to make.
This is from her first cookbook "Northwest Bounty", published in 1988.
With fresh salmon at the market & Sorrel popping up in my yard, this is a wonderful way to use the two together. You could also bake or grill the salmon, make the sauce and add just before
platting.
Serves 4
Poached Fillet of Wild King Salmon
with Wind-Dried Salmon & Sorrel
4-8 oz. Copper River or Wild King Salmon
1 cup dry white wine
1 quart white wine fish stock (see recipe below)
1 1/2 cups heavy cream
1 1/2 oz. shredded wind-dried salmon (dry-smoked kippered salmon may be used instead, though this will add a smoky quality to the sauce rather than the rich salmon flavor that comes from the wind-dried fish)
salt and freshly ground white pepper
3/4 cup fresh sorrel, cut roughly (chiffonade)
To poach fillets, place in a skillet to fit 1 layer and pour in the white wine, adding cold watre to cover if necessary. Bring to a simmer. Cover. Poach at slowest simmer for about 10 minutes.
Meanwhile, make the sauce. Reduce fish stock in a non-aluminum pan to 1/2 cup. Add cream and dried salmon. Simmer until sauce is thickened and of a smooth consistency. The dried salmon will expand as it is cooked. Correct seasoning with salt and white pepper. Five minutes before serving, add Sorrel.
Remove the fish from the poaching liquid, drain and serve immediately with sauce.
Enjoy!
Saturday, May 16, 2009
I catered my son's auction for 185 people last Saturday. We have quite a few red peppers left over ,so I'm going to make red pepper jelly. I will try and do something a little different than the normal red peppers, cider, vinegar, crushed red pepper version. I'll let you know how it turns out and what I end up doing. I've been making different Mostarda's lately, which brings me back to Verona. Italy, 2006. I was with my mom at Marcella Hazan's 80th birthday party. This party took place in a beautiful Villa where Giuliano Hazan has his cooking school. We started out in a large study that had over 100 different types of cheeses paired with wines as well as different types of mostarda's (mustard fruits) and chestnut honey. Mostarda means the
must of the grape and is a main ingredient in a true mostarda. Their are many different types of mostarda such as Mostarda di frutta and mostarda di cremona. I love to use at least 4 different
types of fruit and it's all about cooking the fruit down. Removing the fruit from the syrup, reducing and then adding the fruit back into the syrup until the fruit no longer releases it's own juices and the syrup becomes a beautiful crimson color. I will be posting some great recipes on my website @ www.whatsjuliecooking.com, so stay tuned.
Thursday, May 14, 2009
Braising vs. Stewing
When you Braise you generally use larger cuts of meat, poultry or vegetables in
enough liquid to partially cover over low-heat. This works great for less expensive cuts of meat such as pork shoulder, lamb shanks, pork and beef short ribs. These cuts are very flavorful and when cooked with vegetables, wine, stock, perhaps some tomatoes and spices after 2-3 hours the flavors meld together and the meat is fall off the bone.
I like to brown the meat in my skillet first then add to the pot of sauteed vegetables.
When you make a stew you are doing much of the same as braising but using smaller cuts
of meat, poultry and vegetables. You would also want enough liquid to cover what you are cooking. Our motto is "Low and slow and let it go."
Both can be cooked in a 5 qt. Dutch oven on top of the stove or in the oven at
350 degrees for 2-3 hours or until meat falls apart and is fork tender.
Sunday, May 10, 2009
The Versatility of the Chickpea
Chickpeas and garbanzo beans are one of the same and is a very versatile legume. One of the most popular and widely used in the Middle East is the Chickpea. In Spanish cooking they are referred to as garbanzo beans
and in Italian cooking they are called ceci beans.
The chickpea originated in the Middle East about 7500 years ago. It was first cultivated about 3,000 BC and was popular among ancient Romans, Greeks and Egyptians. It was not until the 16th Century that the chickpea was brought to other parts of the world by Spanish explorers. Nutty and buttery chickpeas come in a variety of colors green, black, brown, red and the most commonly known are the beige chickpea. There are two types of chickpeas Desi and Kabali. Desi have smaller darker seeds and a rough coat. Kabali is a larger, lighter colored bean with a smooth coat.
You can use chickpeas in so many ways but there is no comparison to fresh chickpeas. If you see them at the grocery store (such as Whole Foods) they are around $1.99 lb. they have a green shell on the outside that is easy to open and pop out one chickpea. They may take a while to shell but much less time consuming than the Fava bean. They are a brilliant green in color and I just blanch them for a few minutes in boiling water. Drain and toss lightly with olive oil
and sea salt or add and brighten any cous-cous, pasta, green salads, chicken dish... It will be the topic of conversation at the table. There is truly no comparison to the dried or canned chickpeas we are so used to having. The dried and canned have their part too. They are great cooked and ground into a paste for hummus or roasted and spiced and eaten as a snack. Chick pea flour also called gram flour or Besan. This is great for making flat breads, falafel, lightly coating fish before frying or fermented and made into an alcoholic beverage similar to Sake.
When I was on my honeymoon we went to old Nice,France because my mom told me I had to try Socca. We wondered through the Fleur de Marche (amazing outdoor antique market)in Nice and wondered down some narrow streets until we stumbled upon the famous Socca stand. Socca is made with none other that Chickpea flour, olive oil, water and salt. It is basically a chickpea flour crepe. Nutty, buttery and fabulous. The French love to have a dry glass of white wine with their Socca. It was an amazing food memory I will never forget. It just made me think how one ingredient can be used in so many different ways and in so many countries. Lastly, chickpeas are a great source of protein and fiber and help reduce cholesterol.
Who couldn't love the Chickpea!
Friday, May 8, 2009
Hotel Frontenac Yellow Pea Soup
Our family roots reach to Quebec where cold winters inspired this soup. The ingredients are usually on hand in the cupboard. Serve with crunchy croutons dropped in the soup just before serving. You can use either dried yellow peas or dried green peas.
Hotel Frontenac Yellow Pea Soup
Makes 6 Servings
Hotel Frontenac Yellow Pea Soup
Makes 6 Servings
2 cups dried yellow peas
8 cups chicken broth
2 cups carrot, diced
1 cup yellow onion, diced
1 cup smoked ham, diced
1/2 teaspoon allspice
pinch of cloves
salt and pepper to taste
croutons, for garnish
- Place the peas in the colander and rinse under running water. Transfer to a 5 1/2 quart Dutch oven. Add the chicken broth, carrots, onion, ham, allspice and cloves. Simmer for 1 hour. Season to taste with salt and pepper.
- Ladle into soup bowls and top with croutons.
Monday, April 27, 2009
Willie’s Blackberry Crisp
In the Northwest we have 2 varieties of wild blackberries. One we seek out and the other seeks us out- and threatens to take over our garden every year. Both varieties are delicious, they just lend themselves to different uses. The small, coast trailing blackberry, with it’s sweet-tart flavor, is prized for cobblers, pies and jams. The large Himalayan, which is juicy and seedy, is best in crisps, jellies, spritzer base and vinegars. This recipe is a good way to use the larger berries that are so abundant.
Willie’s Blackberry Crisp
Makes 6 servings
Willie’s Blackberry Crisp
Makes 6 servings
Crust Topping:
1 cup all-purpose flour
1 cup granulated sugar
1 teaspoon baking powder
1 egg, beaten
Blackberry filling:
2 tablespoons all-purpose flour
3/4 cup granulated sugar
4-5 cups fresh or frozen blackberries
1 stick unsalted butter, melted
- Preheat the oven 375˚ F.
- In a medium bowl, combine the flour, sugar and baking powder. Make a well in the center of the dry ingredients and blend in the egg, mixing until crumbly. Set aside.
- To prepare the filling, mix the flour and sugar in a small bowl. Place the blackberries in a large bowl and sprinkle with the flour and sugar mixture. Toss gently to evenly coat the blackberries.
- Transfer berry mixture to a well-buttered 8-inch by 8-inch by 2-inch glass baking dish and sprinkle topping over berries.
- Drizzle melted butter evenly over the crumbly topping. Place baking dish on a baking sheet to prevent spillovers into the oven. Bake for 45 minutes.
Wednesday, April 15, 2009
Grammy's Chutney
Chutney is a sweet and spicy condiment that combines chopped fruits and/or vegetables with added spices. They may be served either cold or warmed, and are excellent over meats.
Grammy's Chutney
Grammy's Chutney
11/2 cups sugar
11/2 cups vinegar
1 large onion
1 green pepper
1 garlic clove
1 lime seeded and sliced thin
11/2 teaspoon cinnamon
1/2 teaspoon cloves
1/2 teaspoon allspice
1 teaspoon kosher salt
1/8 teaspoon cayenne pepper
1/2 cup raisins
Wednesday, April 8, 2009
Caponata
The sweet and sour flavors of this braised vegetable condiment make it a nice accompaniment for grilled or roasted meats.
Caponata
Makes 8 Servings
Caponata
Makes 8 Servings
2 eggplants, cut into small dice tossed with 1/2 cup olive oil
4 cloves garlic, finely chopped
1 yellow onion, finely diced
2 red peppers, seeded and cut into 1/4 inch pieces
2 yellow peppers, seeded and cut into 1/4 inch pieces
1/4 cup olive oil
1 cup pimento stuffed green olives, chopped
1/4 cup capers, drained
1/4 cup red wine vinegar
1/4 cup granulated sugar
1-28 ounce can of diced tomatoes in puree
- Spread the oil coated eggplant on a baking sheet and roast at 350˚ for 25 minutes.
- In a Dutch oven over medium-low heat add 1/4 cup olive oil. Sauté the garlic, onion and peppers. Add the olives, capers, vinegar, sugar and tomatoes and turn the heat down to low. Simmer, uncovered, for 15 minutes. Add the roasted eggplant to the tomato mixture and simmer for 15 minutes longer.
- Serve at room temperature.
Tuesday, March 24, 2009
Normandy Style Seafood Stew
Normandy is one of our favorite areas in France. The abundance of fresh seafood, butter, Calvados and ciders made us just want to go back to our farmhouse and cook. The halibut, scallops and mussels are wonderful with the fennel and Calvados.
Normandy Style Seafood Stew
Makes 8 Servings
Normandy Style Seafood Stew
Makes 8 Servings
11/2 pounds mussels, scrubbed, debearded
1 medium sized yellow onion
1 cup dry white wine
10 sprigs of parsley plus 1/4 cup chopped
2 cups leeks, white and pale green part only, finely chopped
2 cups diced fennel bulb
2 tablespoons butter
13/4 pound halibut fillet, skin removed and cut into 11/2 inch pieces
10 ounces fresh sea scallops
1- 8 ounce bottle clam juice
24 ounces fish stock
4 sprigs fresh thyme
2 bay leaves
1/4 cup Calvados (apple liquor)
1 cup heavy cream
- Combine mussels, 11/4 cup chopped onions, wine, and 6 sprigs parsley in a 6-8 quart Dutch oven; bring to a boil. Cover and cook until mussels open, shaking pot often, about 5 minutes, Using a slotted spoon, transfer mussels to a large bowl to cool (discard any mussels that do not open). Strain cooking liquid into a bowl or large measuring cup; discard onions and parsley in strainer. Add 1 cup water to the mussel broth and set aside.
- Meanwhile, melt butter in the same Dutch oven over medium heat. Add remaining 11/4 cups onions, leeks, and fennel and sauté until leeks are soft, stirring frequently, about 8 minutes. Add your reserved mussel cooking liquid, 4 parsley sprigs, clam juice, fish stock, thyme sprigs, and bay leaves. Simmer uncovered until vegetables are tender and liquid has been reduced by 1/3, about 25 minutes. Add halibut and scallops to broth and simmer until just opaque in center, about 5 minutes. Using a slotted spoon, transfer halibut and scallops to a bowl. Discard parsley sprigs, thyme sprigs, and bay leaves.
- Serve in warm bowls with a crispy baguette and serve with your favorite bottle of white wine.
Monday, March 2, 2009
Keeping your Dutch Oven in Tip-Top Shape!
To ensure a long life for your pot, remember these basic guidelines:
- Just rinse it out with a little soapy water and a soft sponge. To remove any stuck particles from your Dutch oven, soak the pot in hot, soapy water and scrub with a plastic scouring pad. Never use heavy abrasives or metal scouring pads.
- On the stove top, cook over low to medium heat. Never use our Dutch oven over high heat for searing,g, or the enamel will crack and chip.
- Don't leave an empty pot on a hot burner - the enamel will crack.
- Please take care not to drop or bang your Dutch oven, as the enamel coating can chip. However, shipping does not make it unsafe to use.
- Dutch ovens are ovenproof; however, the knobs and handles get hot and stay hot! Be careful! Always use two thick oven mitts when handling your pot.
Saturday, February 28, 2009
Baked Short Ribs with Pasilla Pepper Sauce

This recipe turns out great when slow-cooked in a Dutch Oven. One of the "holy trinity" of peppers, the pasilla is a dried chilaca chile, and is one of my Mom and my favorite peppers to cook with. It's wonderful in moles and sauces. Its smoky yet mild flavor gives this dish an exceptional depth.
Baked Short Ribs with Pasilla Pepper Sauce
Makes 6 to 8 Servings
1 dried pasilla pepper, rehydrated, seeded, stemmed, and finely chopped (To rehydrate the pasilla pepper, place it in a bowl, cover with boiling water and soak for 5 minutes)
4 pounds beef short ribs (boneless), rinsed and patted dry, excess fat trimmed
Salt and freshly ground black pepper
1 Tablespoon olive oil
1 Tablespoon butter
1 medium yellow onion, diced
4 cloves garlic, peeled and minced
1/2 cup pureed roasted red peppers (if using canned roasted red peppers, be sure to drain and rinse them before pureeing)
One 14.5 ounce can tomato sauce
1/2 cup red wine
2 whole star anise
1/4 teaspoon ground cinnamon
1 teaspoon Chinese five-spice powder
2 bay leaves
- Position a rack in the center of the oven and preheat to 350 degrees F.
- To prepare the ribs, season with salt and pepper on both sides. Put a 12" cast iron skillet over medium heat, then add the ribs, fat side down. Cook turning once, until browned on all sides, for 2-3 minutes. Transfer the ribs to a plate and reserve.
- Meanwhile, in a 5 1/2-quart Dutch oven add the oil butter and heat over medium-low heat. Add the onions and cook until they start to soften, for about 5 minutes. Add the garlic and cook for 2 minutes, stirring occasionally. Add the pureed roasted red peppers, pasilla pepper, tomato sauce red wine, star anise, cinnamon, five-spice powder, and bay leaves. Add the short ribs back to the pot. Wrap the lid with a slightly damp kitchen towel, pulling tight, placing the corners on top of the pot. Do not let the towel fall into the dish.
- Put the Dutch oven in the preheated oven on the middle rack. Cook until the meat falls apart easily with a fork, about 1 1/2 - 2 hours. Serve on a plate with buttered egg noodles.

Thursday, February 19, 2009
Cooking with Mom
My love for the culinary arts is a direct result of the absolute enjoyment my Mother takes in cooking. From her I learned the beauty of slow food, the social aspect of food, and how to share my table. I am so thankful for the delicious lessons learned in her kitchen.
This MI-Reporter article featuring my Mom and me is so wonderful, I just couldn't resist posting some of it:
This MI-Reporter article featuring my Mom and me is so wonderful, I just couldn't resist posting some of it:
If flipping through its pages makes you want to drop what you’re doing, run to the grocery store, go home and pull out a giant mixing bowl, says Sharon Kramis, that’s the sign of a good cookbook.
Not only did the former Reporter food columnist’s new book make me wish I was at home in my kitchen, it made me wish I was in my kitchen with my mom.
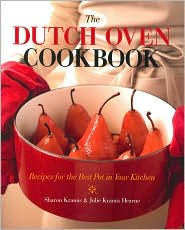
“The Dutch Oven Cookbook” (Sasquatch Books) is the second labor of love Kramis has produced with her daughter, 37-year-old Julie Kramis Hearne. A celebration of “the best pot in your kitchen,” it follows “The Cast Iron Skillet Cookbook” with a hundred or so dishes, from Vietnamese pho to French beignets, that can come out of this slow-cooking cast iron pot.
The enthusiasm that mother and daughter share for the ability of both the Dutch oven and cast iron skillet to yield perfection clearly comes from a shared history of successful meals and the happy times that surround them. In a family whose cooks have done time at the Herbfarm Restaurant in Woodinville, Anthony’s Restaurants, the California Culinary Academy and the cooking school of the legendary chef James Beard, memories are stored in the porous holes of cast iron as much as on the pages of photo albums.
When it comes to what goes on in the kitchen (or over the campfire, where many of their recipes can be produced), Kramis and her daughter are of one mind. When discussing food, it’s always “we” rather than “I.”“It’s almost like we can read each other’s thoughts,” Hearne says. “When I’m cooking and I have a question, I just ask myself, ‘What would my mom do?’”
Even better than eating her mother’s food as a child, Hearne says, was helping to create it. “Making the pasta, making the sausage ... it was the whole process of baking that first loaf of bread,” she says. She recalls faking sickness so she could stay home from school to watch her mother teach classes in Sharon’s Kitchen, a cooking school Kramis ran for several her 40 years on Mercer Island. She later relished accompanying her mother as she trained with Beard at his cooking school in Seaside, Ore.
And after earning her degree in food science and nutrition (just like her mother), when Hearne met the man she would later marry, Kramis pulled from a box an old photo of Harker Hearne in the 8th grade, when he won first place in a cooking contest Kramis judged with his “Auntie Hope’s Fruit Pizza.”
“It all comes back to food,” Hearne says. (click here to read full article...)
Wednesday, February 11, 2009
Dutch Oven 101
The Dutch Oven is my Mom and my favorite pot. Made of cast iron and often enamel-coated, it's the perfect partner to the cast iron skillet - our favorite pan. Dutch Ovens have loop handles and flat bottoms, and always come with lids. They are approximately 4" - 5" deep and range in capacity from 2 - 13 quarts. The name "Dutch Oven" is believed to have originated in the eighteenth century, when the cookware was manufactured in England and brought to the US by Dutch traders.
Historically, the pot was used primarily outdoors. During the pioneer days in the western United States, for example, Dutch Oven cooking was the most important cooking method used. Today, a strong following still cooks with Dutch Ovens over a campfire.
A heavy pot, the Dutch Oven slow-cooks tough meats and melds flavors together to produce melt-in-your mouth tender bites. Use medium to low heat to attain the best results. We prefer the Dutch Oven to Crock-Pot cookery because it slow-cooks without accumulating excess moisture. (See my previous blog article, Cast Iron 101, which talks about pans that "sweat.")
So, grab your Dutch Oven and a sense of culinary adventure - let's make some mouths water!
Tuesday, January 27, 2009
TLC for Your Cast Iron
When using a cast iron skillet it's very important to care for the pan properly. The first thing to remember is: never wash a skillet in the dishwasher! Sometimes, especially after cooking egg dishes, you will have to briefly soak the skillet before scrubbing. Never use metal to scrape the pan. To clean an care for the skillet after each use:
- Hold the pan under hot water add a little mild dishwasher soap, and scrub it clean with a nylon scrub pad or a stiff-bristled, non-metal brush.
- Dry the pan immediately with a towel and rub it lightly with olive oil to keep it from drying out.
- Line the pan with a paper towel and store in a warm, dry place. Store lids separately to allow air to circulate around the pan and lid to prevent condensation, which can lead to rust spots; or keep your pain in the oven, and every time you turn it on the pan will reseason itself.
- If food begins to stick, simply place the pan on the burner on high heat for a minute or two. Take the pan off hte heat source and sprinkle in 1/2 teaspoon of salt and a teaspoon of olive oil. Using an old rag, scrub the inside of the pan. Wipe out any leftover salt and let the pan cool. After the pan has cooled, buff it one more time with a clean rag. That's all there is to it!
Monday, January 12, 2009
Chicken with Herbed Dumplings

This recipe is a family favorite (especially with my kids) for a wintertime Sunday dinner, served with a fresh green salad. The herbs in the moist dumplings and the coarse salt on top really set this dish apart The dumplings usually disappear first, but we like to serve the leftover chicken and vegetables over mashed potatoes the next day.
Chicken with Herbed Dumplings
Makes 6 to 8 Servings
2 Pounds bonelss, skinless chicken breast halves (For a great tasting time-saver, just use the meat from a rotisserie chicken from your local supermarket!)
Salt and freshly ground black pepper
3 Tablespoons olive oil, divided
3 Tablespoons unsalted butter
1/2 yellow onion, peeled and diced
4 ounces small white mushcoorms, cleaned, stems trimmed, and halved
1 shallot, peeled and thinly sliced
1/4 cup all-purpose flour
3 cups chicken stock
3/4 cup heavy cream
1/4 cup dry sherry
4 medium carrots, peeled and cut into 1/2 inch slices
2 celery stalks, cut into 1/2 inch pieces
1 bay leaf
1/4 teaspoon ground or freshly grated nutmeg
1 teaspoon finely chopped fresh oregano leaves
1 teaspoon finely chopped fresh thyme leaves
3/4 cup frozen peas
Herbed Dumplings
1 1/4 cups all-purpose flour
2/3 cup cornmeal
2 1/2 teaspoons baking powder
1/2 teaspoon salt
7 Tablespoons chilled butter
3 teaspoons chopped fresh rosemary
1 cup whole milk
1/2 teaspoon kosher salt or fleur de sel
- Position a rack in the center of the oven and preheat to 425 degrees F.
- To prepare the chicken, rinse the chicken breasts, pat them dry, and cut them into 1 inch strips. Season with salt and pepper and divide into 3 batches. Heat 1 Tablespon of the olive oil in a 10"-12" cast iron skillet over medium heat. Add the first batch of chicken and cook, turning once, until browned on both sides, about 5 minutes. Transfer to a cutting board and repeat with the remaining 2 batches, adding another Tablespoon of olive oil for each batch. Set the chicken aside.
- In the same skilled melt the butter over medum heat. Add the onion, mushrooms, and shallot and cook, stirring occasionally, until the onions have softened, about 5 minutes. Stir in the flour. Slowly add the chicken stock, cream, and sherry, whisking often, and bring to a boil over medium heat. Reduce the heat and add the carrots, celery, bay leaf, nutmeg, oregano, and thyme. Generously season to taste with salt and pepper and simmer for 5 minutes. Return the chicken strips to the skillet and cook over medium heat for 5 minutes. Mix in the peas.
- To prepare the dumplings, whisk together the flour, cornmeal, baking powder and salt in a large bowl. Cut the chilled butter into tablespoon-sized slices. Using a pastry blender and working quickly so the butter remains cold, cut in the bitter until the ieces are pea-sized. (You can also transfer the flour mixture to a food processor fitted with a steel blade, add the butter, and pulse 5 or 6 times.) Gently mix in the rosemary, using your hands or a spatula. Add the milk and mix gently just until the ingredients are wet and slightly sticky.
- Using a large spoon, scoop up some of the dumpling mixture and drop it on top of the chicken mixture. Repeat until all the dumpling mixture is used (you should have about 10 dumplings.) Sprinkle the tops with the kosher salt and return the skillet to the oven. Bake until the dumplings are golden brown, 20-25 minutes. If you want to brown the tops of the dumplings more, brush the tops with melted butter and turn on the broiler for the last few minutes, keeping a close eye on the dumplings at this point. Serve from the skillet.

Subscribe to:
Posts (Atom)